
To understand the Faculty Directory ecosystem fully, please review Getting Started: Faculty Directory.
Faculty bio pages are manually created through the Modern Campus Content Management System (CMS) by trained individuals in each school. Please work with your school or college representative to make changes to the Faculty Directory.
Adding a New Bio Page to the Faculty Directory
Step 1: Get access to Modern Campus CMS
If you are the designated editor of the Faculty Directory for your school or college, ensure that you have been trained and have access to the Modern Campus Content Management System (CMS). For base Modern Campus training, visit our Training and Support page. Once base Modern Campus training is completed, reach out to the SMC Digital Marketing Team at digitalmarketing@chapman.edu for specific Faculty Directory access.
Step 2: Collect needed faculty information (before you are in Modern Campus)
Before entering the Modern Campus CMS, please gather the following information from your requesting faculty member:
- Employee email address (required) – this is required to link their central account to the Faculty Directory.
- Faculty Photos – This image will be shown both in the faculty listing and on the individual faculty profile page. A photo is required for all faculty, full-time and lecturers (formerly known as adjuncts). It should be…
- Cropped to show the person from upper chest to head with a small amount of space above their head. Traditional headshot. *See sample below.
- Sized to 206 pixels in width, with whatever height desired (ideally the image should be 4:5 proportion, or ~244 pixels height).
- Saved as .jpg, .gif or .png format. No .bmp or .psd allowed. (more information on sizing support)
- Named lastname_firstInitial.jpg (e.g. thomas_m.jpg).
- Saved in Cascade in this location:
- Full-time should be loaded into the
/our-faculty/files/larger-photos/faculty folder - Lecturers should be loaded into the
/our-faculty/files/larger-photos/adjunct-faculty folder
- Full-time should be loaded into the
- Faculty bio and contact information – this information can be added at any time after the initial creation, so you don’t need to collect it all in the beginning. To understand the various information options, visit Getting Started: Faculty Bio
*For the photos , here are examples of the correct cropping so that they are uniform on the school listing pages, and so that when used in other applications such as Digital Signage, they are still acceptable:
Correct: 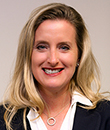
Incorrect: 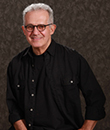
Incorrect: 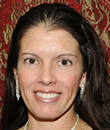
Step 3: Create the new faculty profile page in Modern Campus and connect the faculty email address
- Sign in to the Modern Campus CMS and locate the “/our-faculty” folder within the site tree.
- Within that folder, click the “+New” button in the upper right corner. Select “Faculty Profile Page”
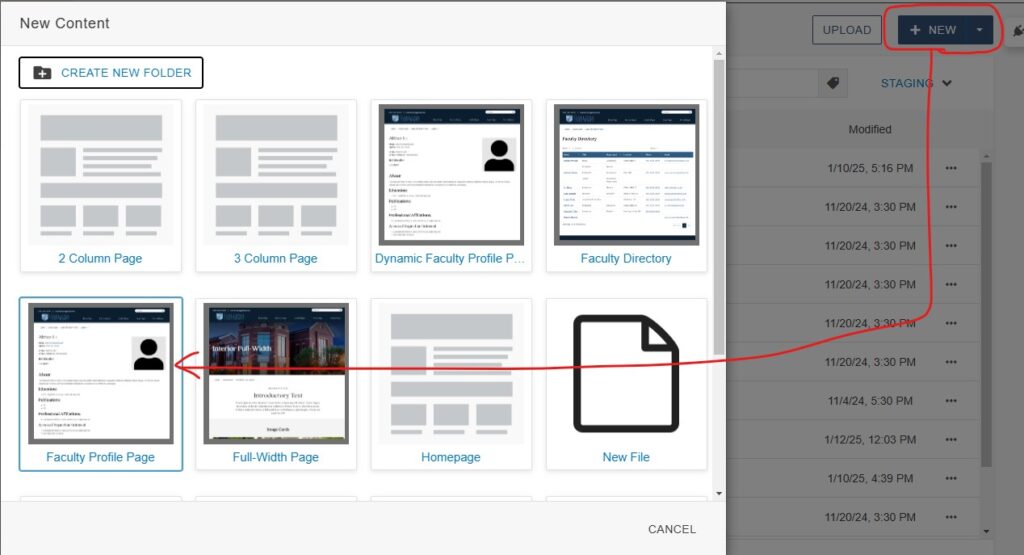
- Change the Filename to the professor’s name following the naming convention and consistency of the other files in the folder, so “firstname-lastname” (always all lower-case, no spaces)
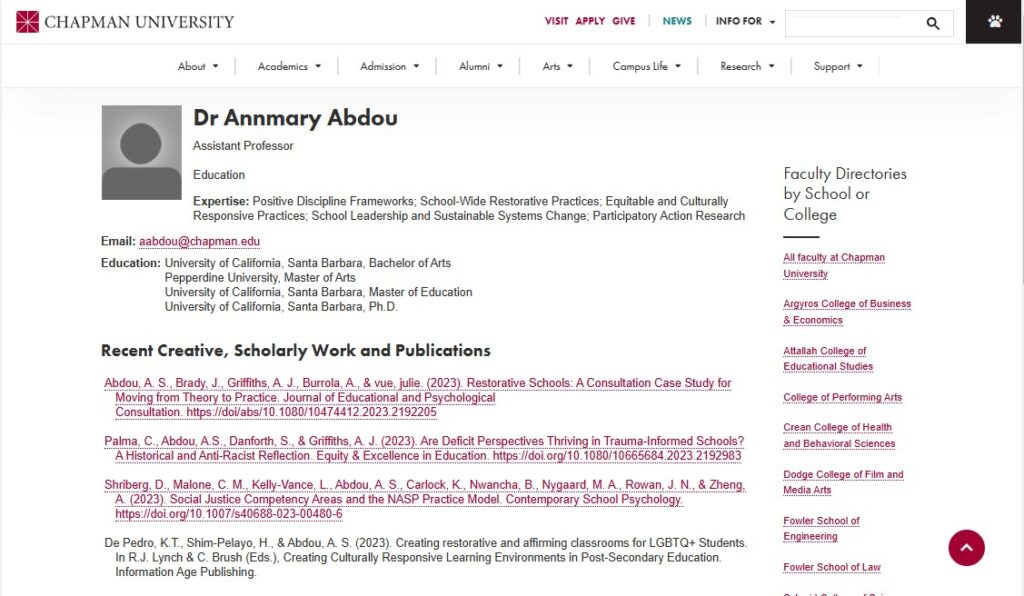
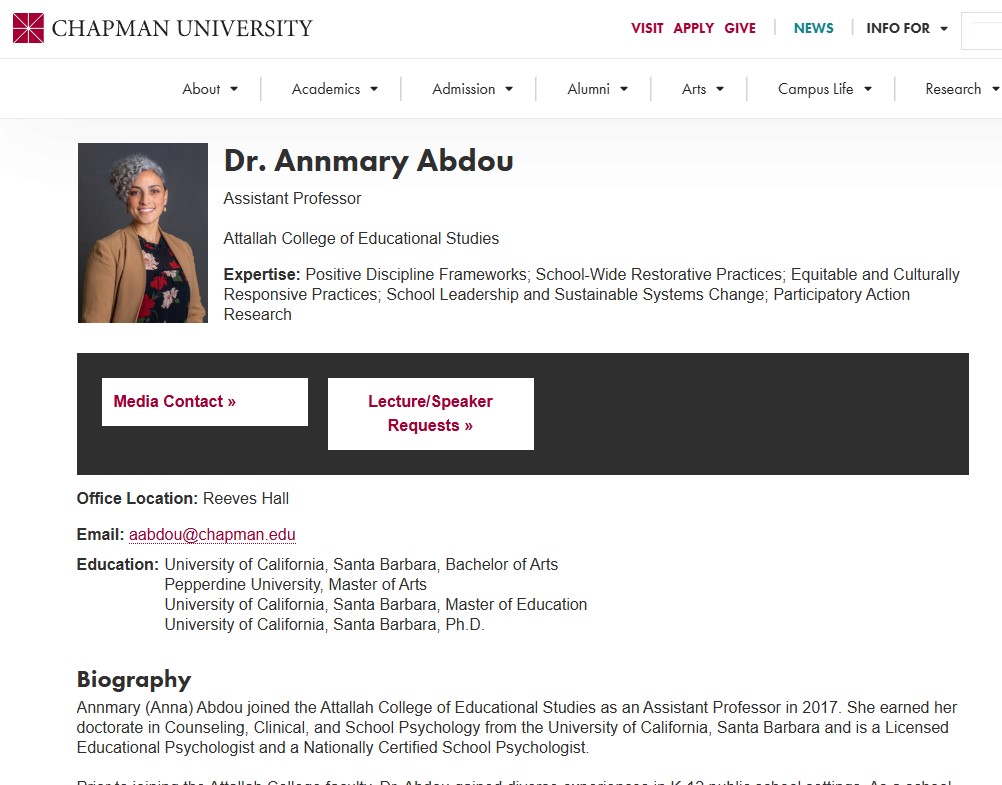
- Change the Page Title to the professor’s name (example: Dr. “Annmary Abdou”)
- Under “General Content,” enter the Chapman.edu email address for the professor – this will link their central account to the Faculty Directory.
- Press the “Create” button at the bottom of the pop-up window (do not change any other page properties).
Once you submit, the new page will be created in the /our-faculty folder located under the name you used. You should see an editable page, populated with basic information about the faculty member from Campus Solutions or other databases, including:
- Name
- Rank and Additional Title(s)
- Schools/Colleges and Departments they teach in
- Degrees (currently not displaying for adjuncts or lecturers)
- Scholarly Works – They are automated and imported from the Annual Faculty Report for full-time faculty, but not adjuncts or lecturers. This is a system run by the Provost’s office, specifically Eileen Besner, who can be reached at besner@chapman.edu. Faculty members access this system themselves to update their scholarly and creative works, and in there can tag which ones they want shown on the public Faculty Directory webpage. These updates cannot be done within the Modern Campus CMS, nor should they be duplicated there.
Step 4: Further edit the page as needed
To make further edits to the page (including adding a photo), click the “MULTIEDIT” button in the upper right of the page.
- Once in Multiedit mode, you will have the option to fill out the other items in the on the page like:
- Image: Here you can link to an image you already uploaded or upload directly from here.
- If you are uploading directly from here, remember to navigate to the appropriate folder within /our-faculty/files/larger-photos to place your image.
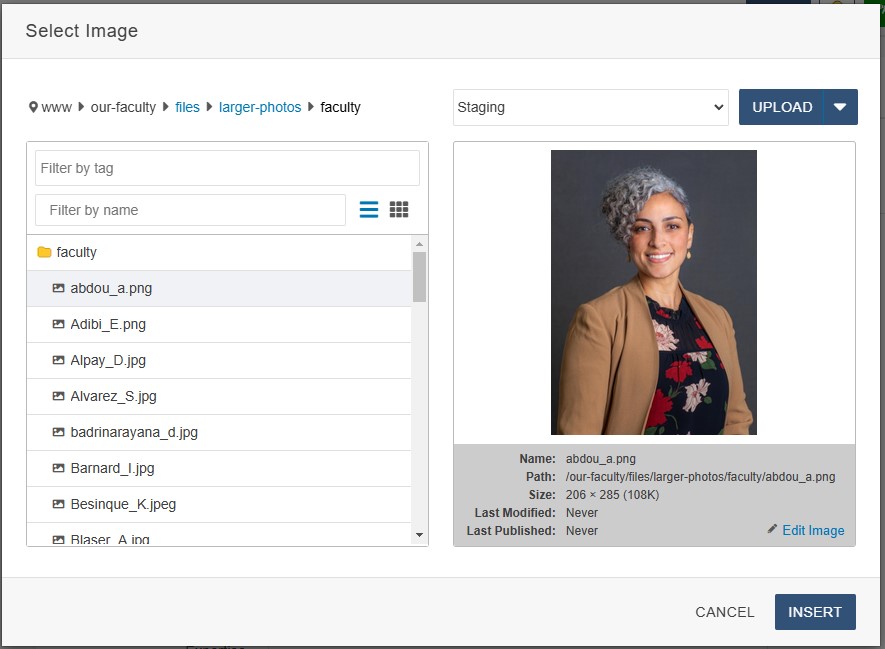
- Be sure to fill out the “Image Description” field – this will populate the alt text once the page publishes (to describe the image for individuals using screen readers or other visual assistive devices).
- If you are uploading directly from here, remember to navigate to the appropriate folder within /our-faculty/files/larger-photos to place your image.
- Name: If the auto-populated name does not match the faculty member’s preferred or known name, it can be updated here. If you leave this field blank, the auto-populated text will remain.
- Rank: This is their title (“assistant professor,” “professor emeritus,” etc.) plus any chairs or designations. Only update if the default display in the page preview is inaccurate or missing information. If you leave this field blank, the auto-populated text will remain.
- Departments: The school or schools with which the faculty member is affiliated. Only update if the default display in the page preview is inaccurate or missing information. If you leave this field blank, the auto-populated text will remain.
- Expertise: The faculty member’s areas of expertise. Only update if the default display in the page preview is inaccurate or missing information. If you leave this field blank, the auto-populated text will remain.
- Office Hours: This is optional and only controlled through Multiedit.
- Office Location: This is optional and only controlled through Multiedit.
- Scholarly Works Links (links and labels to scholarly work cataloging sites such as Digital Commons or Google Scholar)
- Degrees: This should be left blank.
- Biography (should be a summary or highlights, not a full resume)
- Scholarly Works: Because these auto-populate from the Annual Faculty Report, this field should be left blank.
- Links:
- CV – If the faculty member has their CV or resume posted online, you can upload and link to a file from here.
- These should be uploaded into the appropriate “files” folder in Modern Campus; e.g., /our-faculty/files/curriculum-vita/. Filename should contain the faculty’s name (“john-smith-cv.pdf”).
- Media Contact: This will default to pr@chapman.edu, but if there is a different email contact the faculty member has requested, enter that address here.
- Lecture Requests: Typically, this will be the faculty member’s email address, but you may also enter a different email address if requested.
- CV – If the faculty member has their CV or resume posted online, you can upload and link to a file from here.
- Phone: Office phone number
- Website: Link to an external website for faculty member, if applicable.
- Image: Here you can link to an image you already uploaded or upload directly from here.
- Once you are done, click the “Save” button in the upper right of the page and Submit for Publish (or if you are a page approver, “Publish”).
- If you uploaded a new image file during this process, it will not immediately appear in the page preview, but will be published with the page once approved or published.
- It may take a few hours for the new faculty profile to appear on the live website. The faculty directory auto-publishes about every two hours.
Editing a Faculty Member Page
- Sign in to the Modern Campus CMS and locate the “our-faculty” folder within the site tree.
- Locate your faculty member’s name within the folder.
- Click on the desired page and click “MULTIEDIT.” You will see all the options you are able to edit. If there’s something on your profile page you cannot access, most likely this is being pulled another source (Campus Solutions or the Annual Faculty Report). See more detail in the Adding a faculty member section above.
- Once you are done, you submit the page as usual, and within the next few hours the updated faculty profile will appear on the live website. They run on a schedule every two hours.
If you have questions about this process, please contact digitalmarketing@chapman.edu.